Thursday, June 20, 2013

Raising Chickens!

2:55 PM
 
There is a lot to know when it comes to raising chickens.  I would have to say, for the last three years that we have had chickens.  We have probably learned something new each year.

 
First off: 
(1) They've got to be the same age at the same time.
 
Second:
(2) They do not like extreme heat any extreme temperatures of weather (hot or cold).  So there are measures that you have to take for that.


Thirdly:
(3) They like to be together...well most of the time.  (I think that all siblings, chickens or not, sqwabble a little, here & there:) 
 
There's a lot to learn when you are living and raising up the life of the "farm".
 
I hope that you have enjoyed reading today!
 
 
Happy Country Livin'!
 
 
The Farmer's Assistant:)


Monday, June 10, 2013

Building Our Chicken Coop

1:07 PM
 
This past weekend Papa went to town building our coop for our chickens. He built this coop off of a layout that he designed himself! Really:) He looked at some of the dynamics of other designs out there and then combined there measurements for what would work for our space, layout, and number of chickens. I am completely fascinated by his work. I have never seen anything like this. I mean, just to watch him calculate the measurements and even go as far as to note the placement of the railings for his height, seeing that he will be the primary person to move the coop was just absolutely INCREDIBLE.
Take a look at the pics:


Happy Monday to All!
-The Farmer's Assistant:)

Sunday, June 2, 2013

Back Blogging...

2:58 PM
I just wanted to take a moment to let our followers know that we have got LOTS that is going on over in our little part of the world and we want YOU to be in on it:)  We've got several new posts that we will be adding to the blog which will correspond with the dates of the events as they have happened.  So when you see a new post, read on, and even go back a little.  There's a lot of fun things that we have to share with you.  Once again....

Happy Sunday from the Sparks Family Farm!

Planting & Plastic

2:53 PM


So here's what we've got going on today!  If you look back at yesterday's post you can see that Don has gotten five of the unplanted rows mounded up.  Today, he's measuring and cutting plastic and laying down the soaker hose (also known as "drip tape).  Now before he puts the plastic down over the tape, he's got to cut holes into the plastic.  Why?  Well, that's where the plants are going to go in at.  After that, he will be laying the plastic on top of the hose, to help keep the weeds out.
 
You'll will see here below that the soaker hoses are already in place.  Go Papa! 
What's happening this weekend in your garden?  We want to hear from you?  Leave us a comment OR a question down below.  Happy Sunday!
 
-The Farmer's Assistant

Saturday, June 1, 2013

Happy Saturday! Mounded Up & What's Happening

8:30 PM
 
We have had a lot going on these past few days...and I didn't realize that I had not been posting as we had been going all.  So stayed tuned as we be putting up a lot of brand new posts of brand new pics of all that is new with us! 
 
With that being said, here's what's happening around here today.  Okay, I have got to start with the little ones first... we've got two brand new guinea hens!  You read that right, and there just a few weeks old, and they're going to be joining our chickens.  Papa has got them in their own little box, set up with water and feeder (not pictured here) and they are ready to go. 
Next up: we're adding sweet potatoes to the list, among other things.  We've got watermelon, squash and cucumber to be planted.  And already have lots of tomato and pepper plants that are ready to be transplanted outdoors but what Papa did here was he went ahead and got everything mounded up.  Next comes, the soaker hoses, along with the plastic (covering the mounds), then the cardboard, then the mulch.
 
Stick around...you're in for a treat.  Trust me!
 
Sincerely,
 
From the Farmer's Assistant
Happy Saturday!

Monday, April 1, 2013

Our Pear Trees are Budding!

1:37 PM


Our pear trees are budding...our pear trees are budding!  And we are so excited!  I mean, really.  The big deal for us is that seeing buds this spring means that we will have pears (nice-sized pears) in the next year or so.  For now, the trees will probably bear, a smaller variety until the tree(s) get a bit taller and stronger.
 
Happy Planting Everyone!

Friday, March 29, 2013

Back to Smooth it Out

1:28 PM


Our plowman is back!  And just like I promised you, he wasn't leaving the ground the way that he left it once it was "super plowed".  That was just time to give it, for everything to sort of "settle"  before he came back to smooth it out.  But he's back now y'all and we've got all of the nutrients every which way and the soil composition is in stellar postion thanks to a little bit of timing and the perfect plowing. 


Thanks for following our journey!
 
-The Farmer's Assistant

Saturday, March 16, 2013

Super Plodding

1:18 PM


So our plowman came by today and did a real job on this here garden.  He used a device on his plow that basically took all of the rich soil that was near the bottom and brought it to the top and took all of the finer dirt that was on the top and brought it back down to the bottom.  But don't worry, he won't be leaving it like this:)  He will be back to even it out.
 
Happy Gardening to You!
-The Farmer's Assistant


Saturday, March 9, 2013

Time to Plow-Up the Garden

1:13 PM


It is that time again.  You guessed it, right.  It's time to plow up the garden.  Winter is passed (well mostly) and we're getting ready to get things started here.  It's been a long drawn out cold and we all know that things don't grow when everything's cold and solid.  So it's time to have the ground broken up & that's what you see here.  Everything that was old is being dug up and we're getting ready with part one for Garden 2013.  Are you ready?  What is on your grow list for this year?
 
Happy Planning!
The Sparks' 


Monday, February 25, 2013

The Science is in Your Soil

11:24 AM
One key component that needs to be addressed in planning your garden is the soil.  The right kind of soil (and it's acidity level) can make all of the difference between plants that grow and the ones that die.  I want to take the time now to address the issue of the acidity levels and what many of us are plague with in the Carolinas and that is clay.
 
I saw this article today on About.com.  It touches on some of the bases that we need to begin to address if we're going to have a prosperous garden.  Take a look:

Taken from "Organic Gardening" on About.com
 
Clay soil is prevalent many parts of the United States, and it can be a real pain if you happen to decide that you want to plant a flower or vegetable garden. While many trees and shrubs grow well in clay, the roots of the majority of annuals, perennials, and vegetables just aren't strong enough to make their way through. And if spring flower bulbs are your dream, forget it. Bulbs tend to rot over the winter in clay soils. With a bit of background about clay, and a strategy for improving your soil structure, you'll be able to grow flowers and vegetables to your heart's content.to grow flowers and vegetables to your heart's content.

What is Clay Soil?

Clay soil is defined as soil that is composed of mostly clay particles. Soil that consists of over 50% clay particles is referred to as “heavy clay.” To determine whether you have clay soil or not, you can do a simple soil test. Most likely, you probably already know if you have clay soil. If your soil sticks to shoes and garden tools like glue, forms big clods that aren't easy to separate, and crusts over and cracks in dry weather, you have clay.
Positives of Clay Soil
Even clay soil has some good qualities. Clay, because of its density, retains moisture well. It also tends to be more nutrient-rich than other soil types. The reason for this is that the particles that make up clay soil are negatively charged. They attract and pick up positively charged particles, such as calcium, potassium, and magnesium.
Negatives of Clay Soil
In addition to the drawbacks mentioned above, clay also has the following negative qualities:
  • Slow draining
  • Slow to warm in the spring
  • Compacts easily, making it difficult for plant roots to grow
  • Tendency to heave in winter
  • Tendency to be alkaline

Improving Clay Soil

Improving your clay soil will take a bit of work, but the good news is that the work you do will instantly improve the structure of your soil and make it easier to work with. Most of the work is done up front, with some annual chores to continue improving your soil.
It is best to improve an entire planting area all at once. I often see advice about just improving individual planting holes as you go along, but I don't recommend this practice. When you dig a planting hole in clay soil, then plop in a plant and nicely amend only the soil you use to backfill, your plant will be happy for a little while. But what you've essentially done is make the planting-hole equivalent of a flower pot. Eventually, the plant will start sending out roots, but when they reach the limits of the nicely amended soil you backfilled with, they will have a hard time expanding into the hard clay around them, and will start circling around in the planting hole instead. You'll end up with a perfectly root bound plant, and it won't grow as large or as healthy as it should.
Decide how much area you want for your new garden. If you are improving an existing bed, you'll just have to dig out any plants you want to keep, and then you can get started. If you are preparing a brand new bed, there are a few more steps to consider.
To improve your soil, you'll need to add six to eight inches of organic matter to the entire bed. You can add any organic matter you can get your hands on. Grass clippings (as long as they haven't been treated with chemicals), shredded leaves, rotted manure, and compost are all perfect choices. Spread your organic matter on top of the soil. Here's where the manual labor comes in. The organic matter needs to be mixed into the top six to twelve inches of soil. Digging it in and mixing it with a shovel is a great way to do this, as it moves a lot of earth without pulverizing the soil particles the way tilling can. However, if digging is just too hard on your back, using a tiller is a fine method.
When you're finished, your garden bed will be several inches higher than it was originally. It will settle some over the course of a season, but the soil structure will keep improving as microorganisms in the soil work to break down all of the organic matter you've added. The bed can be planted immediately, however. You'll be adding more organic matter on the top of the bed once or twice a year. This will continue the process of improving the soil's structure and offset any settling that happens.

Testing for Fertility and Adding Fertilizers

After a season or so, it's a good idea to collect a soil sample and have it tested to see if you have any nutrient deficiencies or pH issues. The report you get back will offer suggestions for how to improve the garden further. Add any organic fertilizers or soil amendments outlined in your report, and your bed will be perfect for growing healthy plants.
It's a bit of work. But you can be secure in the knowledge that you won't have to waste time struggling with clay soil again.
 
Happy Gardening!
~The Farmer's Assistant:)

Sunday, January 27, 2013

Getting the Garden Ready!

12:18 PM
It's that time again!  After a summer marked by erradict heat and changes in the weather the fall and early winter have been a quiet, quiet season in our garden.  It is now time to start pulling up anything and everything that's been left over from the fall, and plow the garden to prepare for spring & summer planting.
Today, Papa went out to the garden to find that there were still some herbs trying to make a come back in the midst of it all:)
Our corn also needed to be pulled up. 
(Now, usually, we will have a fall garden, and when we do, these areas are already plowed
over and cleared out but since we didn't there are some of the summer plants still remaining).
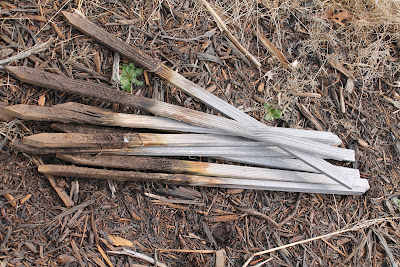
As well as many of the stakes:
These were the stakes that we used as supports for pepper plants and garden borders on the second half of the garden.
 Now one might think, "why not re-use the stakes from the previous season?"  If you look closing in the picture on the right, you will see were part of the stake began to rot.  And that can happen.  Now you can use metal stakes but they're going to be a little more pricey.  So stick to the wooden stakes.  If you need something for support for a plant (like peppers or tomatoes with cages) that are going to be growing tall, they're the way to go!